Fresh and minty!

This is the 500+ board I was using until now!
As you can see on this second picture this board was plagued by the "Varta Killer",
the onboard clock's battery, that it's a well known destroyer of plus boards...
Here you can see the damage caused by electrolitic liquid from the varta!
Btw this board was saved with a deep clean, the substitution of some components and a couple of patch wires, here the underside of the board
I've used this machine without any issue since I got it, but while roaming for amiga's stuff on "flea-bay" I stumbled upon a listing of a 500+ board without any damage and looking very clean, for 100€.
The complete reproduction boards costs nowaday costs A LOT, I mean even 500€.
So getting an official clean board for such a low price was a deal I could not refuse... so I pressed buy!

Waited a couple of days and...

BOOM!

The board was on my desk!

It looked better than I tought, not even a little damage caused by the battery!!

I proceeded on moving all the juicy parts from the old board to this new one...

let's take a look at the under side!

Installed the shield and all the other stuff...

And it was ready!

Not only ready, but Fresh and minty!

Thx for reading and remember not to break your floppies!

Amiga 3000 power on the 500!


The time has come!

Meet the 3000 500!
This is my most powerful original amiga!

It's rocking an a501 expension with working clock installed as chipmem exp.!
bringing this machine in par with a stock plus chipmem wise.
1MB Chip.

here a couple of shots, I've been lucky enough to save this a501 before the battery melted everything!

Desoldered the shield!

Cleaned the board and installed a new rechargable battery. (you can see some light damage done only to the protective coating, had to scrap it off.)

And here it is in all it's glory!

But let's check the heart of this Miggy!

Yeah the Chinon drive is a bit rusty, but as soon as the top case is removed you can see this is not the usual miggy!

So let's remove the keyboard to take a look at the real juice!
The HARDITAL BIGBANG
It's an awesome accellerator board.

It brings this Machine to the level of an Amiga 3000 with 2MB of 32bit Memory
a 68030 running at 25MHz coupled with it's FPU.

I decided to install a switch to be able to choose to run the card in 68000 mode...

On top of the floppy drive...

Using such an accellerator requires the use of an Hard Drive to be able to use it properly, but the Commodore A590 is not compatible with it, so I'm using a Multi Evolution 500!

Here it is, dismantled for your viewing pleasure!
Sporting a new Blue LED... Cause, why not?

A very useful external SCSI port! (Zip drive!)

Here the lovely SCSI 8GB HD itself

And the board with it's 2Mb of memory (look at those lovely roms! Sent to me by my great penfriend M!)


This is my 5Mb 25Mhz Commodore "Amiga 3000"

A 500.


I hope you enjoied taking a look under the clothes of this machine!
Cya in the next post!

And don't forget to take the ball to the beach!

More juice for the Amiga 500!

I completed my Accellerated Amiga 500 project!


But I'll talk about it in a later post.

Today we talk about it's power needs... such a powerful amiga needs a proper power supply mainly because the hard drive uses amiga for power without any extra power

The solution is to mod a non working commodore power supply and use a meanwell RT65B that can provide 5v 8A / 12v 3.5A / -12v 1A
The original Amiga's one is  5v 2.5A / 12v 1A / -12 0.1A

As you can see the amperage of this new one is enought for 2 amigas with this configuration xD

Here it is btw:
 

I did a quick test when it arrived, powered and checked all the outs

Adjusted 5v:
 

Tested 12v and -12v


I then did a quick test with the amiga


Good, it was time to fit it inside the shell... It's not just a tight fit, it actually needs more space, there is cutting involved...


Couples of flaps removed and the screw poles cutted and boom!


Sadly the power button was not fitting so I had to put a spacer, an ugly but functional idea!

Here it is completed:

Ehehhe I know its not looking very clean lol
Maybe in RT65B the "B" stands for bad (looking)

Yes bad, but only the looks cause this beast works very well!


I'll talk about this miggy later, still need to make some little refinements.
Cya :->

Keep that boing ball bouncing!!


The lost Amstrad

 Some days ago I was roaming in an antique's shop full of random stuff, mostly old toys and various kinds of old fornitures, when I reached the first floor I noticed something hidden in a mess of wires...

It was an Amstrad CPC 464! Yeah!!

While leaving I noticed that there were lots of CRT and lucky me I saw it's screen!!

An Amstrad GT65!!

The original green phosphors screen!

Luckily the screen itself comes with the power output for the computer and the screen's connector built-in!

As soon as I got home I rushed to connect everything and try using this machine!


This pictures comed after a lot of troubleshooting tbh... here what I did...

It were not powering on... :(

I proceeded on removing the screws and that was strange, there were some kind of mod to the video ouput port, I had to remove a couple of resistors and restore 2 tracks that were cutted. Maybe that was why when I were connecting the screen even with the computer not powered on it were losing the "still black" image. You can see the two restored tracks that are joined with a blob of solder.


 But no luck yet, that just worked on mantaining the screen alive when connected, but the 464 were still not powering on...
So I kept on looking around, but everything seemed ok!
I just connected the two wires going to the power button and boom!
The computer boots!

I then had a lot of issues with the cassette deck, had to replace some bad rubbers to see it start spinning the cassette tape, but the definitive fix was putting a spacer in the pause button mechanism, cause without it the deck had a hard time pushing the tape.

It was time for some Lotus Turbo Challenge gameplay,
But sadly without any music... that would need a more powerful 128k CPC464+


That was fun!
But why not add a simple mod to the CPC to make it more modern friendly?

I connected a mini jack connector to load games with a smartphone, pc or any kind of player!

The mod was really simple, just connect the wires to the tape's head points on the cassette's deck board!


 Here the result:


I really enjoyed fixing this Amstrad CPC 464 !
OLD STUFF RULES!

Thanks for reading!

And don't forget to keep your retro passions rolling!


Fixing daisychain support on Commodore Amiga 1010 Disk Drive


Check the update at the end of this post!

The Commodore Amiga 1010 disk drive is the first external Amiga floppy drive, originally designed for the Amiga 1000, It's the only official drive that "should" support daisychaining of other drives trought a passtrought port on the back.

BUT the port is actually not working, it misses the power lines, both 5v and 12v.

There are apparently two versions of this drive (german production and another one maybe for the U.S.A. market)
We did this mod on a german model, so if you are attempting to do this on a different drive, better use a multimeter first and check if it needs this or not...
(I saw some reports on-line that the U.S.A. model passtrought connector works OOTB)

The fix is very easy to do, just add the missing power to the port from the floppy connector in the mainboard.

It's a two solder job!

Just disassemble the drive and take the PCB out:
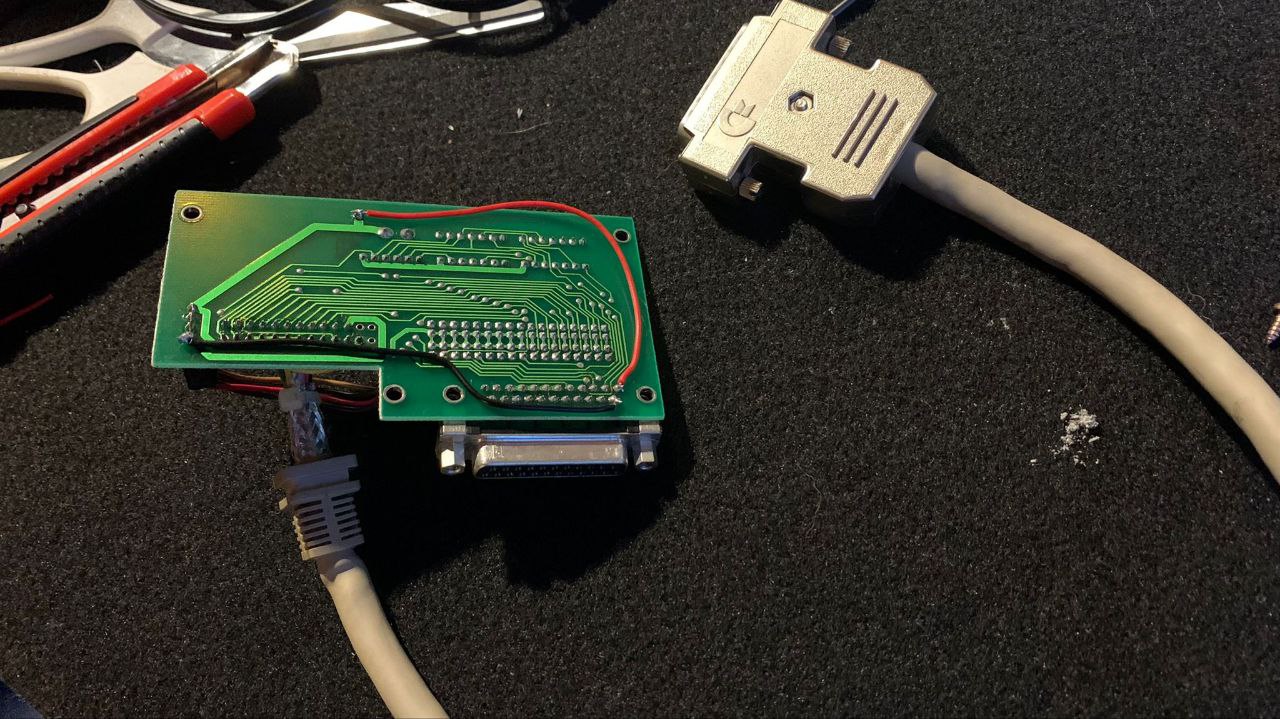
Turn it upside down and solder the first cable as showed in this picture:

Then the second one:

Just to be safe, use a multimeter to check if there is any short!

If everything is OK, it's time to reassemble the Floppy Drive.

That's it, nothing easier actually!

Some proof shots:


Thanks for reading, hope this helps someone! :D
If it does, leave a comment!

As Always: Amiga forever!

UPDATE:
I managed to get another 1010 drive, and in that one daisychaining works OOTB!

The board it's different here a quick look at it:

Here the model number:

As usual...
keep the amiga rollin'!